| Layers
|
Layers are listed in order from the inside space to
the outside on the left side of the Layer
Details panel. Each layer contains a list of physical and thermal properties
data. This data can be edited to suit your project’s needs. Click the arrow
buttons to show and hide the physical and thermal properties data specified for
each layer.
Constructions have the following physical and
thermal properties:
-
Thickness – The total thickness of the
material layer.
-
Density – The material density or
mass per unit volume.
-
Conductivity – The property of a
material that indicates its ability to conduct heat.
-
Specific heat – The amount of heat
required to change a material's temperature by a given amount.
-
Vapor resistivity – The time and
pressure needed to force a unit amount of water vapor through the material
layer.
Right clicking on a layer detail opens a menu with these
options:
-
Change layer – Enables a materials
drop-down list to select a new material for the selected layer. The layer
number or position within the construction and details such as thickness are
maintained while the change is occurring.
-
Delete layer – Deletes the layer from
the construction. You are asked to confirm the delete.
|
| Add
|
Used to create a new layer to the selected
construction. Clicking the
Add button activates the controls in the
layer list. Initially, new layers are added at the end (nearest to outside) of
the construction layers without a material specification. A drop-down list is
provided for selecting a material to apply. The drop-down list materials are
categorized by type. Expand the types to access the individual material
definitions. When a material is selected, the layer thickness property must be
defined as a minimum to add the layer. Once thickness is entered, a number is
assigned to the new layer, and it appears in the construction's graphic
representation on the right side of the Layer Details panel.
|
| Delete
|
Used to delete the selected layer.
|
| Reverse
|
Used to reverse the order of construction layers.
|
| Move up/down buttons
|
Click the up pointing arrow icon to move selected
layers up in the list order or nearer to the inside of a wall for instance.
Click the down pointing arrow icon to move selected layers down in the list
order nearer to the outside of a wall for instance.
|
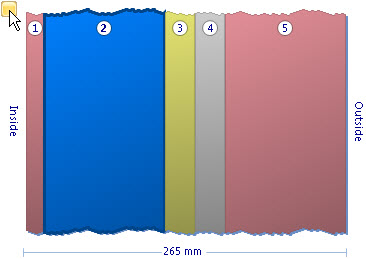
| Graphical display
|
Material layers are graphically represented in
order from the inside space to the outside. Thicknesses are displayed
proportionally with the full construction fitting into the graphical display
area.
- Rotate icon — Click
the rotate icon (upper left) to rotate the construction by 90 degrees.
- Inside/Outside —
For constructions with wall set as the default usage, the two labels indicate
which side of the construction is the inside and the outside. Layer number one
is always towards the inside.
- Top/Bottom — For
constructions with ceiling or floor set as the default usage, the two labels
indicate which side of the construction is the top (inside space) and the
bottom (outside space). Layer number one is always towards the top.
- Layer number —
Layers are labeled with a number that corresponds to its order in the
construction. Changes to the order also update the numbering.
- Dimension —
Construction thickness is displayed with the dimension, and is used as a
reference. Changes to layers and new layers as well as changes in units update
this dimension.
- Layer component
information — Material and thickness is displayed in a pop up tool tip when the
pointer is positioned over a layer.
- Graphical layer
component select — Activate the layer in the layers list by clicking on the
layer graphics.
- Right click option
- flip orientation — Similar to the Rotate icon, the right click option rotates
the construction 90 degrees.
|